I decided this year that instead of trying to produce a ton of small pieces, that I wanted to focus on creating larger pieces that stretch my creativity. Making little pins is fun, but it gets very repetitive. At the end of last year, I started working on concepts for a collection – The Pathos of Things – which I’m very proud to share the first piece of today.
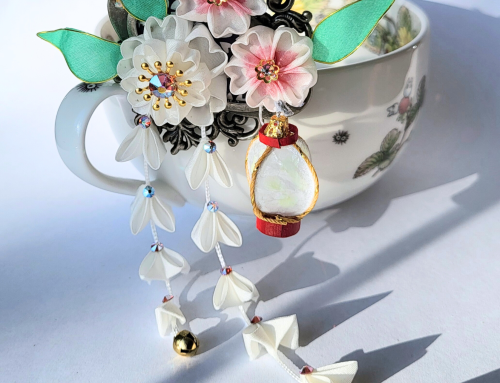
I’m starting with miniature, 5″7″ pieces, to test my painting techniques and new kanzashi making materials – including dip resin and iridescent film, which I used to make the cicada featured in this autumnal kanzashi.

The theme for this collection is the changing of seasons, and in a greater sense, impermanence. I started with autumn because it was the one I had to clearest image for in my mind, and I already had the colors I used for the flowers and foliage. I don’t do a lot of preparatory drawings for my pieces; I prefer to start by dyeing the colors, put the flowers together, and add elements until the piece feels complete. Having the colors in hand made crafting the kanzashi go much faster.

The most difficult part was the cicada. The body shape didn’t come out perfect, but the segmented effect came out how I hoped it would. I did the body and head as two separate pieces because I wanted the wings to attack under the head. The wings are gold wire frames with fantasy film adhered to the back using very thin beads of jewel-it embellishing glue, and coated with clear varnish to add strength. Once the wings were on, I glued the head in piece, then proceeded to add small green tsumami craft ‘scales’ and a piece of thin gold decorative wire. To finish it off, I added pink swarovski crystal eyes and gold glitter wire legs.
I’ve been collecting kanzashi for more than eight years now, and I’ve often felt it was a great shame that most of my kanzashi are kept in the storage boxes they originally came in, instead of being displayed. It’s generally recommended that you keep your kanzashi in a dark, dry, environment for protection; if you keep them exposed to sunlight the colors will eventually fade. But, that’s generally true of all art pieces. I thought, why not find a way to display my kanzashi, so that the display is it’s own piece of art and still looks nice even when you’ve removed the kanzashi to wear it?
In kanzashi shops, they are usually displayed by sticking the pin into styrofoam that’s been mounted onto the wall. It’s not particularly attractive, especially after the styrofoam starts to get worn and you can see all the holes from repeated pins being stuck in. I thought maybe I could take a deep gallery wrapped canvas, and insert a piece of form behind it. If I cut a hole in the canvas, then the pin could be stuck through the canvas and into the styrofoam.


For this canvas, I wanted to do a lacquer effect; black background with gold fall leaves. I started by coating it with gesso and sanding it down to a smooth finish. There are about 10 coats of gesso, and I sanded between every two coats. Once the canvas prep was completed, I painted it a nice flat black. I also sanded this down after two coats to ensure the canvas would be very smooth.
Once the background was done, I created a stencil with fall leaf designs. I just sketched the design onto a piece of bristol board and cut it out with a pen knife. I taped the stencil in place with masking tape, then took a loose round brush and used gold wax paint to buff the fall leaf design onto the black canvas. I did the same for the sides of the canvas, since I wanted it to look good all the way around; gallery wrapped canvases don’t have frames.
I thought I would be ready to clear coat the painting once the stenciling was complete, but it didn’t look finished. So, I used a gold gel pen to outline the leaves and add details, like veins and stippling. I let it sit for a day, and felt pretty good about it, so I proceeded with clear coats of spray paint. I used several coats to achieve a lacquered appearance. Overall, I think the canvas is very successful; it looks like lacquer ware to me anyway!

Once the spray paint was dry, I started applying tsumami craft flowers to the canvas itself. This was probably the easiest part, as I had designed the stencil with positioning for tsumami craft flowers in mind. Since the canvas was coated with thick clear sealer, and the glue is water soluble, it was very easy to clean up any excess glue using a damp q-tip.
With great trepidation, I cut a hole into the canvas for the kanzashi to stick through. It took a bit to arrange the kanzashi so that it sat perfectly in the canvas, but after a bit of careful tugging and wire bending, I got it to fit pretty well. There is a bit of wrinkling around the hole where the kanzashi goes in and out, which gets covered up when the kanzashi is in place. But even if it isn’t, the flaws aren’t noticeable unless your eyes are super close to the canvas.
In the end, it didn’t need a piece of foam in back; it slides in flat. I ended up using a longer hair pin than I had originally intended, and the end of the pin slides in between the canvas and the wooden frame, holding it in place.
It’s very rare when a piece turns out pretty much exactly how I imagined it would, and this one truly did. Overall, I’m extremely pleased with how this piece turned out, and I’ve already started on the next piece in the collection.
Anyhoo, that is about all I’ve got for this week. Your support is greatly appreciated, and I hope that you check back again next week for more art, crafts, and creativity!
PS: The shop is going to be closed for a few months while I finish up some of these larger pieces and exhibition submissions. But, when I reopen I’ll have lots of new pieces available. 🙂